Using CardBuilder

The first time CardBuilder was mentioned in KylixDriver Architecture topic that assures of the possibility to automate the creation of your User-Mode driver. CardBuilder is constructively a Kylix IDE design window, a descendant of TClxDesignWindow class, not just a non-modal design-time window. This tool is established as the component editor for the device-modelling component whose class is TkdCustomCard. At the same time CardBuilder is established as the property editor for CardItems property of this component.

Being of a design window class, CardBuilder itself becomes a part of Kylix IDE. By means of a greater part of specific interfaces this fact allows to do things by far easier, turning out CardBuilder to be the whole instrument for design-time work. Just as the native Kylix IDE designer simplifies the visual development (management of components, management of their properties, inter-consistency between source code and visual controls, streem work and other), CardBuilder behaves so over any project involving the device-modelling component and all other components that make up the KylixDriver Application Library.

Purposeful components from this library are represented by Final Resource Classes, called so in KylixDriver terminology.

These components are also called card resources (or device resources) because they are a software abstraction of real hardware resources of different natures: memory, ports, interrupts and other.

Not all design-time code is encapsulated in the implementation of CardBuilder class. The design-time work is also addicted to the object-oriented approach and this is a good chance and a convenient way to properly handle with the majority of card resources in the development stage now and in the future. That is why necessary design-time code is brought to the implementations of card resources themselves, and that is why there are two versions of the KylixDriver Application Library: run-time and design time (in /rtl and /dtl folders correspondingly).

CardBuilder is an excellent tool for two major phases in your hardware driver development:

Hardware diagnostics: After the hardware is held by you, insert it into an appropriate slot (PCI/ISA) and use CardBuilder to verify that the hardware is performing as expected. And PCI (and any progressive PCI) card should be automatically detected with its resources ready to be automatically constructed by ‘Quick Card’ mode.
Testing application generation: This application allows you to test your hardware on a console and, more important, gets you an introduction of how your User Mode driver to-be should approximately look like, how different methods and properties are involved in work and which setup and cleanup sections surround some calls.

To use CardBuilder:

  1. Set ScriptPath property to directory where the GDD (kdmodule.o or kdmodule.ko file) resides
  2. Set ModuleLoaded property to true. If everything OK, ModuleLoaded property remains set to true, otherwise it comes back to false again

  1. Define your ISA/PCI device’s I/O and memory ranges, registers. Define interrupt(s) and other resources.
  2. If your card is ‘Plug and Play’, then by this moment CardBuilder had automatically detected almost all of its resources: all port ranges, all memory ranges, interrupt, and configuration space. And hence, CardBuilder had automatically constructed the card model by creating, attaching and adjusting all adequate Kylix components. You card model is almost ready, the only step to do yourself is to define registers.
  3. For non-‘Plug and Play’ hardware define resources manually.

  1. At first, your card must be registered. Click ‘Register Card’ speed button, or simply choose ‘Register Card’ menu item from ‘Card’ menu.
  2. Now read from and write to I/O and memory ranges, as well as to and from any registers you defined. Most of components’ properties cannot be changed after the card was registered, however you can bravely change remaining properties, for example, those responsible for transfer, thereby stating all transfer operations maximally flexible, as necessary. Writing operations, sure, require from you to enter sufficient data to write. There are comprehensible editors on a number of CardBuilder’s working tabs at your disposal.
  3. Listen to your hardware’s interrupts, if any.
  4. After the diagnostics is finished, unregister your card by clicking ‘Unregister Card’ speed button, or simply choosing ‘Unregister Card’ menu item from ‘Card’ menu.

  1. Select ‘Testing Application…’ menu item from ‘Generate’ menu or press the appropriate speed button.
  2. Next, ‘Code Generation Options’ dialog box will appear.
  3. Change default values, if necessary, and press ‘OK’ button to generate.
  4. Open a console/terminal window.
  5. Go to the directory where the testing application was stored.
  6. Successively execute the generating and the running shell scripts, if produced, to see how the application is working. Execute these scripts at the console prompt as follows:

./kappbuild.sh

./kapprun

Again, the testing application can be referenced as a sample of User Mode driving utility or can even be a starting point for you.

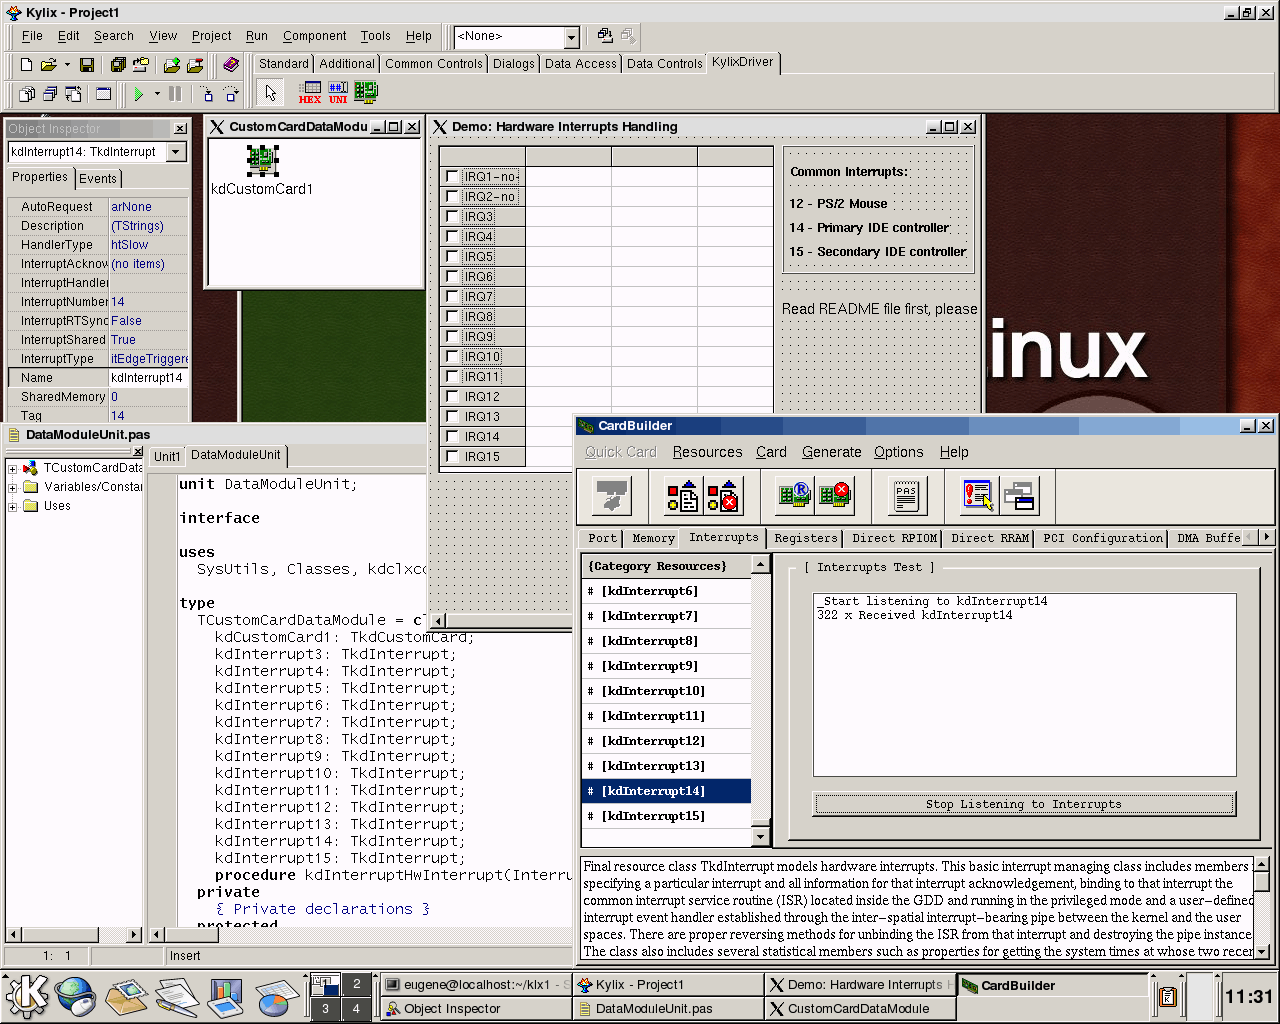
Figure 2: CardBuilder is effective in the definition of device model and in the diagnostics of corresponding hardware